Saturday 24 October 2015

5 Quick and Easy Hairstyles

Hey everyone! So for those days when your in a rush or overslept, here's 5 quick hairstyles you can always do. Most of the pictures are self explanatory and easy to work out, but you can also read the instructions for guidance :) So if you need some hair inspiration, keep reading! Hope you enjoy :)

Half Up Braided Crown

1) Split your hair into a middle part
2) From one side pick up a small section of hair, not your front pieces but halfway on your head.
3) Braid loosely for a more effortless look
4) Repeat on the other side
5) Secure down one braid, wrapping the other one below it with a hair grip/bobby pin

( If you have more time you can loosely curl the ends of your hair to complete the look)
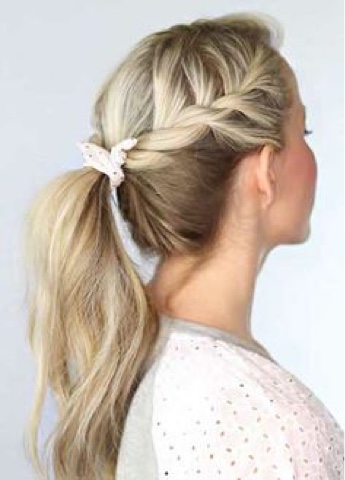
Twisted Pony Tail

1) On one side of you head start twisting a small section of your hair, just wrapping two pieces of hair around eachother.
2) Add a small piece of hair to intertwine into the twist from the hair above the twist.
3) Then a small piece of hair from below the twist.
4) Keep repeating this, you don't have to twist all the way down to ends of the piece of hair as it will get gathered in a pony tail.
5) Lastly gather all your hair, including the twist and tie it up with a cute pony tail holder.

This may seem tricky to understand at first in written form but I promise it's easier than it seems ;)

Inverted Half Up Half Down Pony Tail

1) Gather the front sections of your hair, from either side of your head.
2) Secure the two pieces around your head with a hair elastic
3) Loosen up the pony tail slightly and flip the pony tail into the loop.

Messy Side Braid

1) Flip most of your hair onto one side creating a deep part on one side
2) Start braiding down your hair loosely to create an effortless look.
3) Pull apart your braid, not completely so that your left with stray hair strands, just to thicken it up a little.
4) Finish off with hairspray on your roots.


Tucked In Twist

1) From the front side of your head start doing a simple twist to your hair
2) Repeat this step only on the other side of your hair
3) Pick up a layer of hair and secure one twist under it on, half way on your head
4) Repeat this step with your other twist, hiding it under the same layer of hair


Hope you found some inspiration in these hairstyles, some might be tricky to grasp at first, but I hope the pictures are a good visual representation of them to help you understand. Thank you for reading!
Comment and follow us please for more! X

-Eliza

Halloween Cupcake Recipe

Hey everyone! So Halloween is this month and I'm soo excited! So today I thought I'd tell you how to make some fun cupcakes that taste AMAZING!

Ingredients- (makes 10 cupcakes)

For the cupcakes:

  •   50g Butter     
  • 120g Caster Sugar
  • 160g plain flour
  •  2 teaspoons baking powder
  • 160ml milk
  • 1 egg
  • Vanilla extract (depending how strong you want the vanilla to be)
  • Black food colouring

For the icing:

·    100g icing sugar
·    50g butter
·    Dash of milk
·    Orange food colouring


Add the black food colouring to the milk until you get your desired colour and pre-heat your oven to gas mark 4. Cream the butter and sugar together. Then fold in the flour and baking powder and gradually add the milk. It seems like a lot at first but using more milk and less butter makes the cupcakes so soft and delicious! Add the egg and vanilla extract and continue beating the mixture thoroughly. Spoon the mixture into cupcake cases (preferably black because...well, Halloween!
For the icing, cream together the butter and icing sugar. Then add the food colouring until you get the colour how you want it.

For extra decoration, add some black sprinkles and whatever other Halloween-y decorations you can think of and you’re done! ;)

~Alissa x

Saturday 17 October 2015

Contouring and Highlighting

Contouring has become a massive thing in the makeup world over the last few years and there are hundreds of tutorials about it all over the internet. Having watched probably more than 3 days worth of footage all about contouring and highlighting, I had still never managed to get it right and it doesn’t help that I’m majorly lacking in the cheekbone department :/ But from every video I’ve watched about it and every blog post I’ve read, I’ve managed to pick up some tips and tricks, put them all together and (for me) come up with the best way of contouring and highlighting my face. (Grab some snacks because I'm guessing that it'll be a long one)

Before reading this, it'd probably be a good idea to find out what contouring and highlighting is if your not sure :)

Contouring


I used to think that contouring was just impossible unless you were already blessed with perfect, Angelina Jolie like cheekbones because having tried quite a few contouring products before, they always made me look like an orange mess and never came out right no matter what. I couldn’t see what I was doing wrong; I would follow every video on YouTube exactly how they said and I got VERY frustrated when it didn’t look good. So I figured that I was using the wrong shade for my face. Looking at people who naturally had sculpted cheekbones, I noticed that the ‘contour’ wasn’t really like the brown coloured shades that I’d been using, but more a cool grey tone. Thinking I would have to splurge out for another contouring kit, I decided to leave it be as I hardly EVER do contour. So I was more than glad when I came across the Delicious Eyeshadow by Makeup Revolution from Kaushal Beauty’s channel, and it’s only £1! Using that made me get the hang of this whole contouring business and I feel like it’s a great shade for most people (if not you could always add a more bronzed powder on top). I’m guessing that the Hoola Bronzer is a great colour if your skin is more pale because it’s a cool brown shade, so isn’t too harsh on your face.

Friday 9 October 2015

Sick Day Essentials

Hey everyone! Colder seasons are here and I feel like almost everyone is becoming sick, or is it just me? But if we're trying to be optimistic here, at least it's an excuse to be lazy and lounge around (me every other day...) Anyways to make these days less hellish here are some tips and tricks for comforting day snuggled in bed! :)

~ Food ~

1. Hot Drink
Sick day mornings can be the worst, especially if you wake up with a sore throat so make sure you have something to warm you up, I would obviously recommend hot chocolate because, well...CHOCOLATE! Herbal tea or even just a homemade mixture of heated lemon juice and honey with ginger, it does wonders for treating a sore throat and coughing.


2. Oatmeal 
Another comforting food would be oatmeal or porridge, which I actually really love on just a normal day and it is really quick to make so you don't have to stand around for it for too long, especially if you use the instant oatmeal brands.


3. Chicken Noodle Soup
We all know Chicken Noodle Soup is a classic for treating colds and it tastes amazing too. The ginger really helps! Unfortunately I'm not talented enough to make my own recipe so here is the link to the best one I've tried yet :p
http://www.bbcgoodfood.com/recipes/1869/chicken-noodle-soup

And for those of us who don't want to put in that much effort into making Chicken Noodle Soup, which is understandable, a good alternative would be Pot Noodles Chicken and Mushroom which is so simple to make. You just fill it with boiling water to the marked line, leave it to stand and you're done!

~ Makeup and Outfit~
What's even worse than being sick is, going OUT while you're sick. Here are is an easy makeup look and outfit that's easy and laid back, but still put together so you DON'T look like you're dying inside..

Makeup

Thursday 1 October 2015

September Favourites

Hey everyone! So this month I've tried out a lot of new products so today I thought I would talk to you about some of my favs!


1) Sleek Original Eyeshadow Palette 

The eyeshadows is this palette are VERY pigmented. They are all shimmery except the matte black and although I prefer my eyeshadows to be matte, these are always great for a special occasion!

2) Rimmel Wake Me Up Concealer

This stuff is honestly the best concealer I have EVER used. It covers up amazingly as well as brightening under your eyes. The consistency isn't too thick which is something that puts me off about many concealers and it feels very lightweight. 

3) Makeup Revolution One Blush Stick

This is supposed to be a stick blusher, however the shade I have is Matte Malibu so it can easily be pulled off as a contour shade. You can get either a matte or a sheer look by applying it with a wet brush and the finish is amazing. Although I've personally never tried it myself, a lot of reviews say it's a great dupe for the Nars Matte Multiple but 6x less the price!


Moving away from the makeup and onto the skincare side of things. These products are incredible and always make your skin super soft after your shower!